波场昨日推出JustWrappe匿名钱包的功能,目前有两种方法可以得到1U空投,但是门槛都不算低。前提是必须是安卓系统手机。 一种是规则是: 1.在bo宝(
Tron Link )上创建一个匿名地址 2.以Google表单提交您的地址链接。 3.关注孙宇晨推特+转推“我的地址是XXX” 4.每位参与者将获得1 USDT 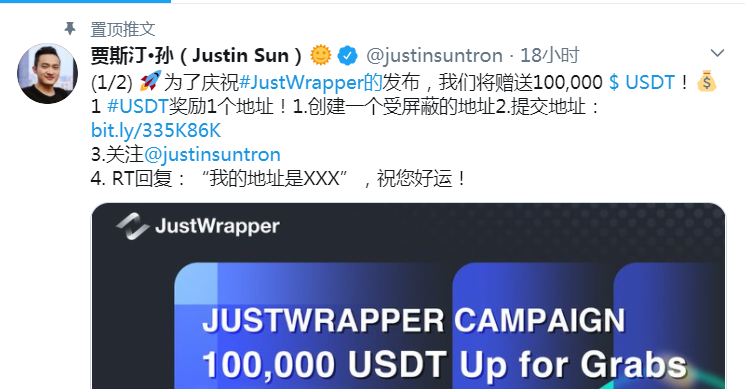
奖励将在10个工作日内自动空投到获奖者的屏蔽钱包中。 活动时间是:香港时间9月27日至10月7日 第二种方法是: 1.转发朋友圈海报不可以设置观看权限。 2.表单内需正确填写微信号,钱包匿名地址并上传朋友圈截图。 3.活动结束后的10个工作日内,奖励将自动空投到获奖者的匿名钱包。 4.此活动仅限高端用户群(持波场10k+)参与,非高端群用户填写无效。 虽然小编也在群里但没有参加,群里参与的人数也并不多,海报转发朋友圈后,即可按要求填写表单: 链接 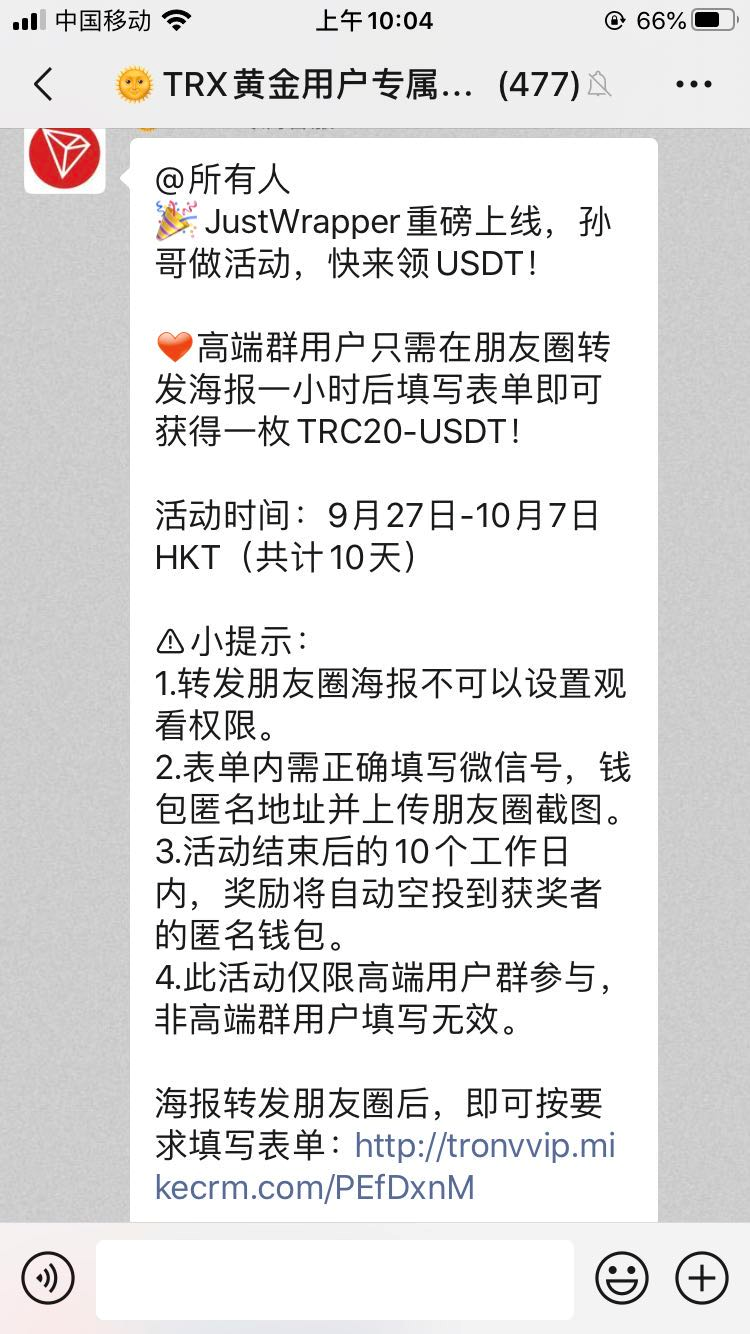
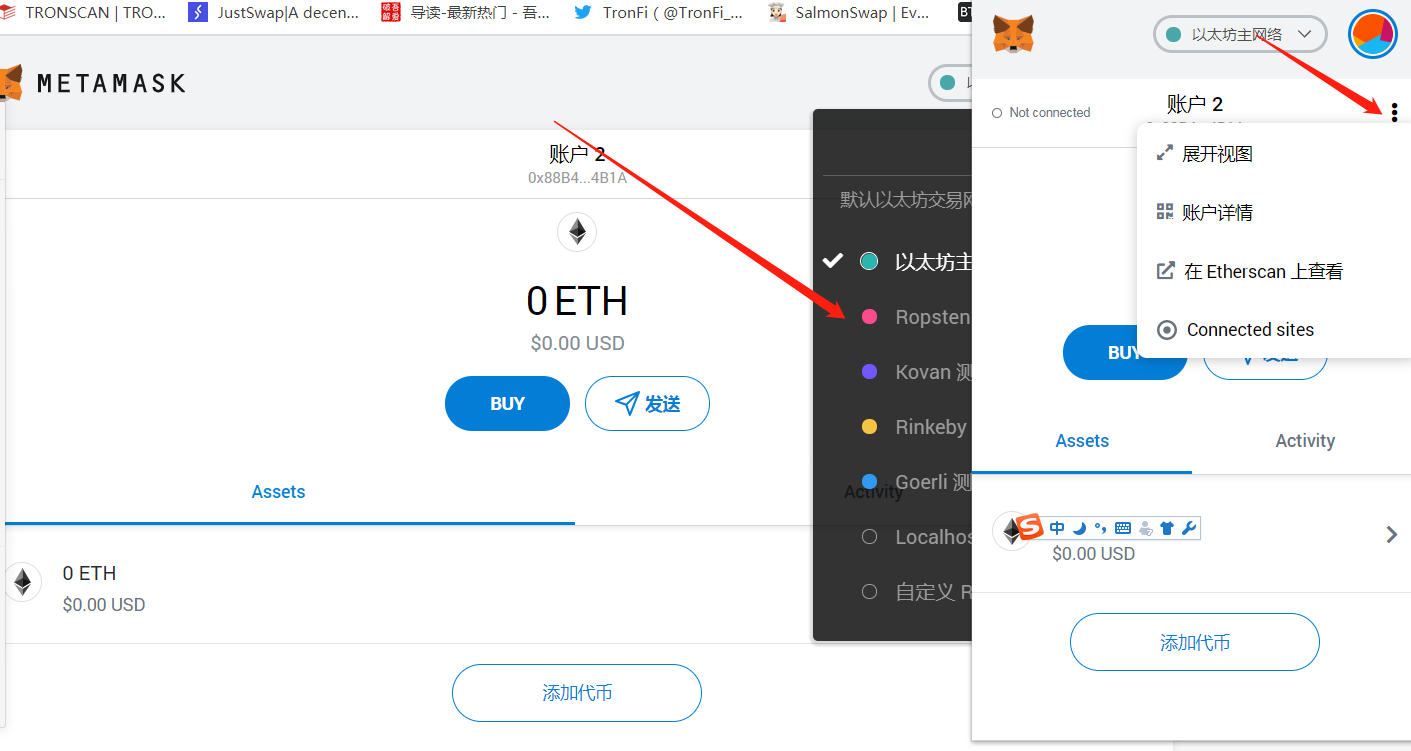
DEGO空投被劝退 昨天九点的空投,临时又被改成九点半了,九点半刚过,小编就进去领,当时支付了12美元的汽油费,但很快以太坊的网络就堵了,合约调用手续费也飙升到了16美元,甚至一度到了20美元,直到半夜三点,这笔交易才算完成,抽到了一个塑料锄头。 为此大概支付了150人民币的转账费用(加上从交易所提款到钱包)。收到了一个初级nft和0.05 的未知代币DANDY。 为了这个空投,我准备了八十个钱包,并且都完成了机器人的任务,结果昨天领空投才发现,所有的钱包参不参与任务都可以领,不但白忙活了两天,且因高额的转账费,撸空投的想法也被劝退了,最后就只领了一个。 如何在以太坊创建加密货币令牌 步骤1. 创建一个MetaMask帐户 用Google Chrome浏览器Metamask钱包可,点击账户展开试图,选择第二个以太坊测试网络 
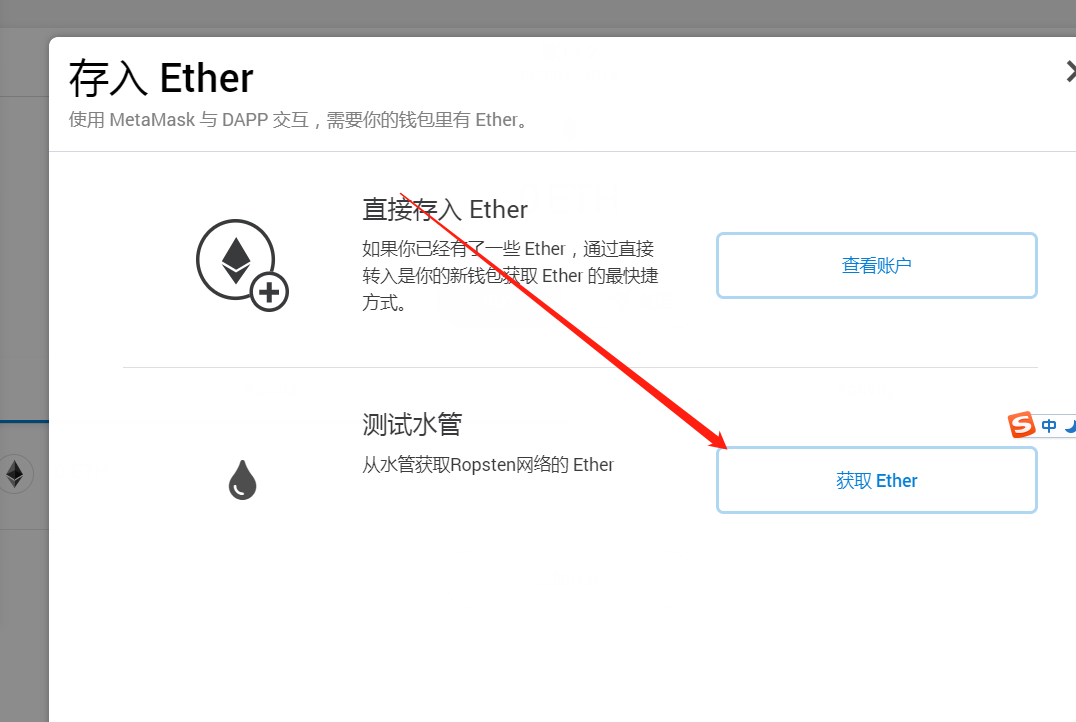
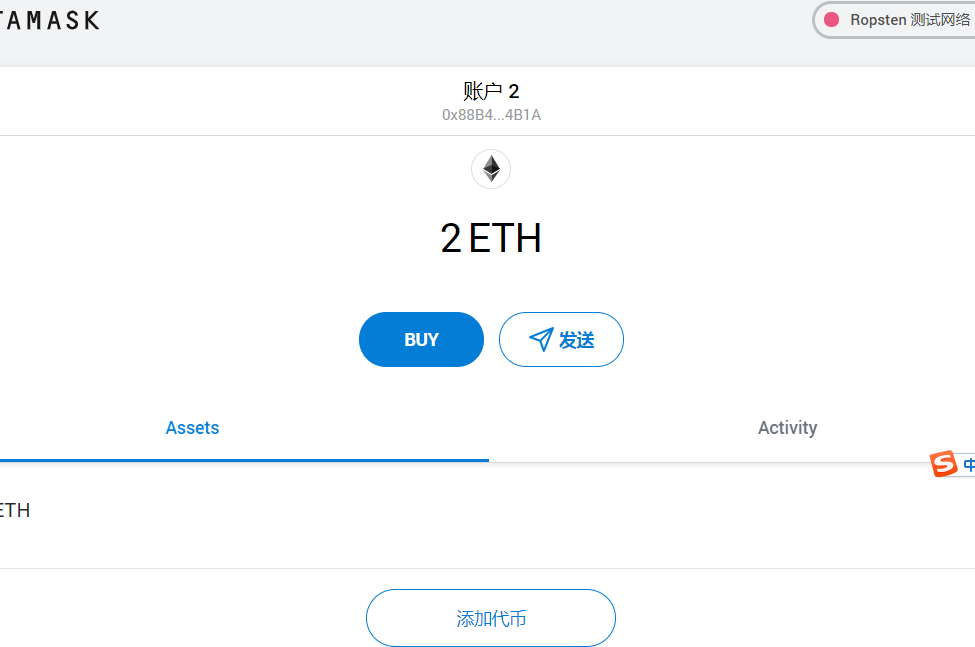
。 第2步。向您的钱包添加一些以太币 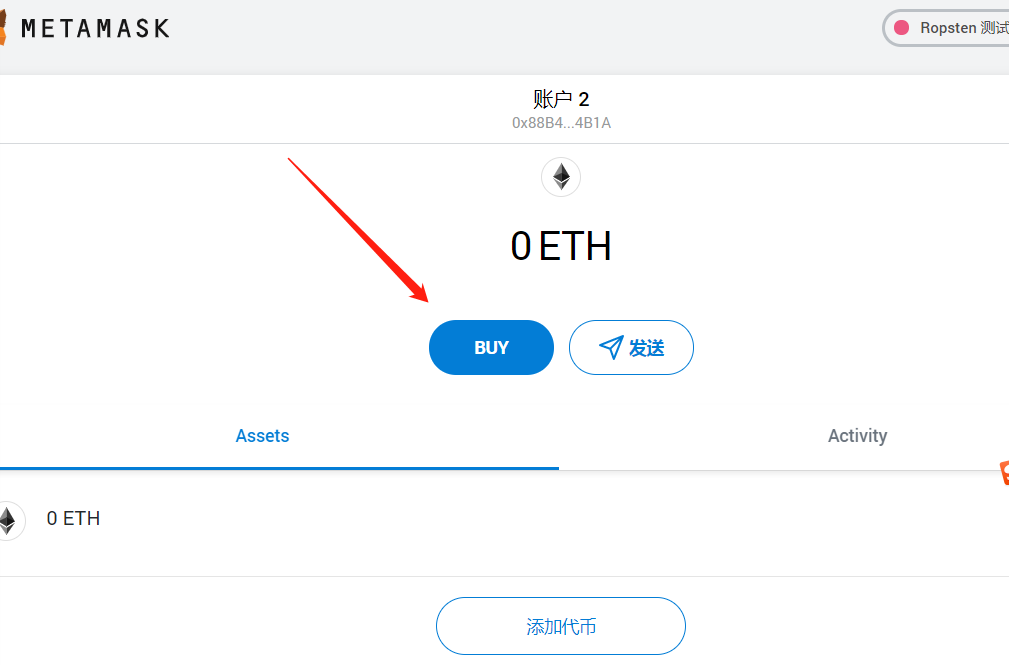
步骤3.创建令牌 打开以太坊合约部署网站,单击网站左上角的+按钮以创建一个新文件 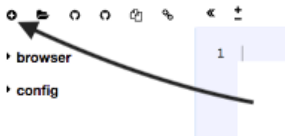
然后将此代码粘贴到代码编辑器中
pragma solidity ^0.4.4;contract Token {
/// @return total amount of tokens
function totalSupply() constant returns (uint256 supply) {}/// @param _owner The address from which the balance will be retrieved
/// @return The balance
function balanceOf(address _owner) constant returns (uint256 balance) {}/// @notice send `_value` token to `_to` from `msg.sender`
/// @param _to The address of the recipient
/// @param _value The amount of token to be transferred
/// @return Whether the transfer was successful or not
function transfer(address _to, uint256 _value) returns (bool success) {}/// @notice send `_value` token to `_to` from `_from` on the condition it is approved by `_from`
/// @param _from The address of the sender
/// @param _to The address of the recipient
/// @param _value The amount of token to be transferred
/// @return Whether the transfer was successful or not
function transferFrom(address _from, address _to, uint256 _value) returns (bool success) {}/// @notice `msg.sender` approves `_addr` to spend `_value` tokens
/// @param _spender The address of the account able to transfer the tokens
/// @param _value The amount of wei to be approved for transfer
/// @return Whether the approval was successful or not
function approve(address _spender, uint256 _value) returns (bool success) {}/// @param _owner The address of the account owning tokens
/// @param _spender The address of the account able to transfer the tokens
/// @return Amount of remaining tokens allowed to spent
function allowance(address _owner, address _spender) constant returns (uint256 remaining) {}event Transfer(address indexed _from, address indexed _to, uint256 _value);
event Approval(address indexed _owner, address indexed _spender, uint256 _value);
}contract StandardToken is Token {function transfer(address _to, uint256 _value) returns (bool success) {
//Default assumes totalSupply can’t be over max (2??? — 1).
//If your token leaves out totalSupply and can issue more tokens as time goes on, you need to check if it doesn’t wrap.
//Replace the if with this one instead.
//if (balances[msg.sender] >= _value && balances[_to] + _value > balances[_to]) {
if (balances[msg.sender] >= _value && _value > 0) {
balances[msg.sender] -= _value;
balances[_to] += _value;
Transfer(msg.sender, _to, _value);
return true;
} else { return false; }
}function transferFrom(address _from, address _to, uint256 _value) returns (bool success) {
//same as above. Replace this line with the following if you want to protect against wrapping uints.
//if (balances[_from] >= _value && allowed[_from][msg.sender] >= _value && balances[_to] + _value > balances[_to]) {
if (balances[_from] >= _value && allowed[_from][msg.sender] >= _value && _value > 0) {
balances[_to] += _value;
balances[_from] -= _value;
allowed[_from][msg.sender] -= _value;
Transfer(_from, _to, _value);
return true;
} else { return false; }
}function balanceOf(address _owner) constant returns (uint256 balance) {
return balances[_owner];
}function approve(address _spender, uint256 _value) returns (bool success) {
allowed[msg.sender][_spender] = _value;
Approval(msg.sender, _spender, _value);
return true;
}function allowance(address _owner, address _spender) constant returns (uint256 remaining) {
return allowed[_owner][_spender];
}mapping (address => uint256) balances;
mapping (address => mapping (address => uint256)) allowed;
uint256 public totalSupply;
}contract ERC20Token is StandardToken {function () {
//if ether is sent to this address, send it back.
throw;
}/* Public variables of the token */
string public name = “AmaBox”; //Name of the token
uint8 public decimals = 3; //How many decimals to show. ie. There could 1000 base units with 3 decimals
string public symbol =”AMA”; //An identifier: eg AXM
string public version = ‘H1.0’; //human 0.1 standard. Just an arbitrary versioning scheme.//
// CHANGE THE FOLLOWING VALUES FOR YOUR TOKEN!
////make sure this function name matches the contract name above. So if you’re token is called TutorialToken, make sure the //contract name above is also TutorialToken instead of ERC20Tokenfunction ERC20Token(
) {
balances[msg.sender] = 10000; // Give the creator all initial tokens (100000 for example)
totalSupply = 50000; // Update total supply (100000 for example)
name = “AmaBoX”; // Set the name for display purposes
decimals = 3; // Amount of decimals
symbol = “AMA”; // Set the symbol for display purposes
}/* Approves and then calls the receiving contract */
function approveAndCall(address _spender, uint256 _value, bytes _extraData) returns (bool success) {
allowed[msg.sender][_spender] = _value;
Approval(msg.sender, _spender, _value);//call the receiveApproval function on the contract you want to be notified. This crafts the function signature manually so one doesn’t have to include a contract in here just for this.
//receiveApproval(address _from, uint256 _value, address _tokenContract, bytes _extraData)
//it is assumed that when does this that the call *should* succeed, otherwise one would use vanilla approve instead.
if(!_spender.call(bytes4(bytes32(sha3(“receiveApproval(address,uint256,address,bytes)”))), msg.sender, _value, this, _extraData)) { throw; }
return true;
}
} 步骤4.编译代码 在“编译”选项卡中,选择编译器版本0.4.25,并确保“自动编译”已打开,并且“启用优化”已关闭 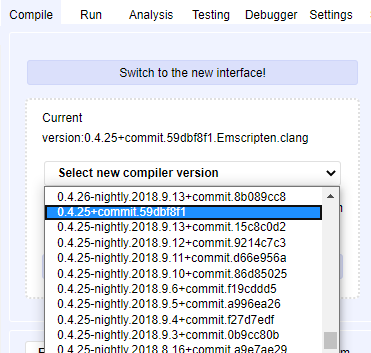
现在返回“运行”选项然后在选择ERC20Token之后单击“部署”。 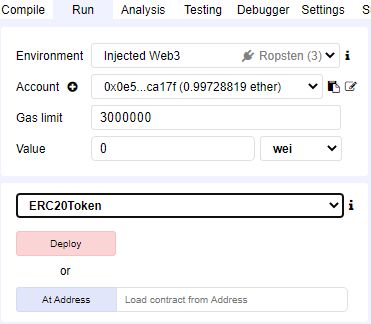
现在,您需要等待一分钟,直到它处理信息为止,您应该在小部件上看到一个弹出窗口,说明交易已确认。要验证该信息,请单击MetaMas小部件,“设置”和“在Etherscan上查看” 
您可以看到您帐户的交易,这里有“合同创建”,单击并复制其地址。 步骤5.将令牌添加到您的钱包 回到钱包,然后单击添加令牌。单击按钮后,从弹出的窗口中转到“自定义令牌”选项卡并粘贴合同地址。如果一切顺利,应该能在钱包中看到令牌。 现在,每个步骤都已完成,并且您的令牌已在Ropsten网络上启动并运行,如果您想制作一个新令牌但要在以太坊网络上运行,则需要支付30美元左右的费用,但步骤是相同的
—-
编译者/作者:窃格瓦拉
玩币族申明:玩币族作为开放的资讯翻译/分享平台,所提供的所有资讯仅代表作者个人观点,与玩币族平台立场无关,且不构成任何投资理财建议。文章版权归原作者所有。
|